Building an AI personal assistant with no code
I read Geoffrey Litt’s blog post about an AI assistant made of just a SQLite table and some cron jobs and immediately wanted something like it for myself.
Since I work at Airtable, I wanted to see how far I could go by building a similar system in a single Airtable base without writing any code. I was thrilled to end up with what is the most useful (to me) AI-powered thing I have built to date.
This post is the first in a series explaining how to build your own customizable AI personal assistant in Airtable.
Chapter 1: A personalized morning brief
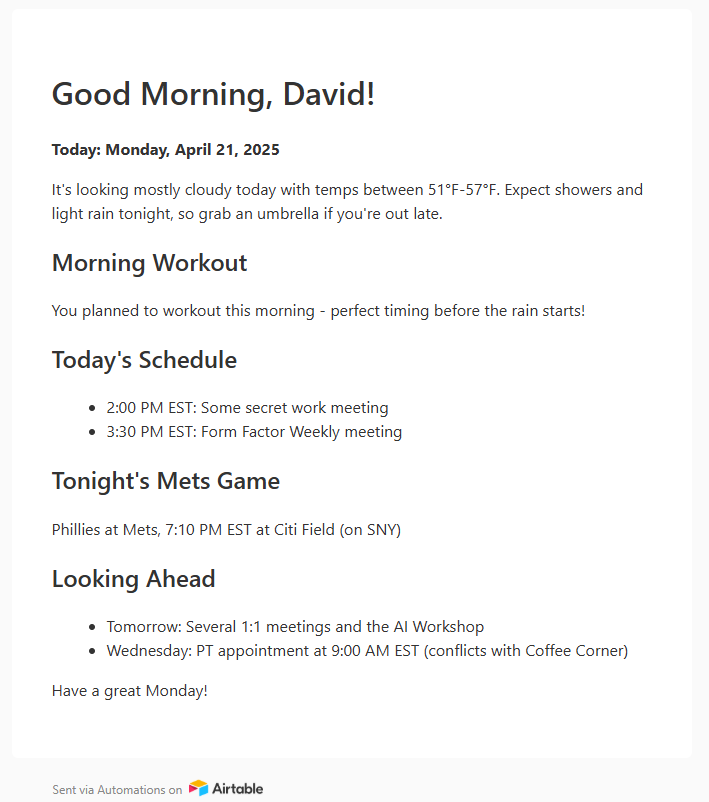
By the end of this chapter, you will have an AI-powered system that sends you a personalized message in the morning before your day begins. This daily message will contain a summary of your Google Calendar and any other time-based data you might want to stay up-to-date on.
Initial setup
- Create an Airtable base with access to Airtable AI.
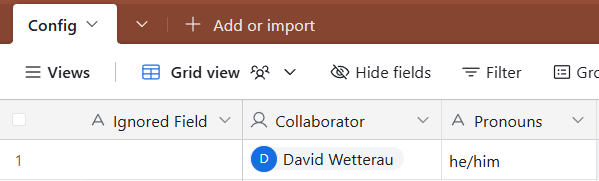
- Create a table named
Configin your base that looks like the following:
📅 Create a Google calendar sync table
To create a Google Calendar sync, follow the first two steps in the (help center instructions).
Your config should look like the image below. 
- For the second config page, leave it on
All fields in the source and fields added in the future - Rename this table to
Calendar - (Optional) You can add additional sync sources to this same table to bring in other calendars. If you do, be sure to include the sync source later on when you are filling out AI prompts.
Create a “Context” view
- Create a new view in the
Calendartable calledContext. - In the
Contextview, set up some filters to only include events for the current week, as shown in the screenshot below.- (Optional) Exclude events such as “holds” or “blocks” that you don’t want your assistant reminding you about (this is what the second gray box below does).
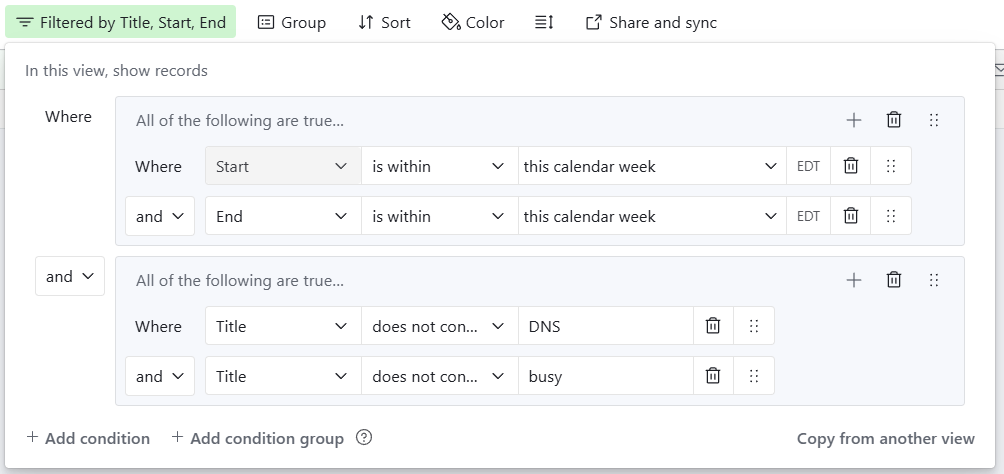
- (Optional) Exclude events such as “holds” or “blocks” that you don’t want your assistant reminding you about (this is what the second gray box below does).
- On both the
StartandEndcolumns in yourCalendartable, enable theUse the same time zone for all collaboratorssetting and select your timezone. If you get a warning here, it’s okay - just “Confirm”.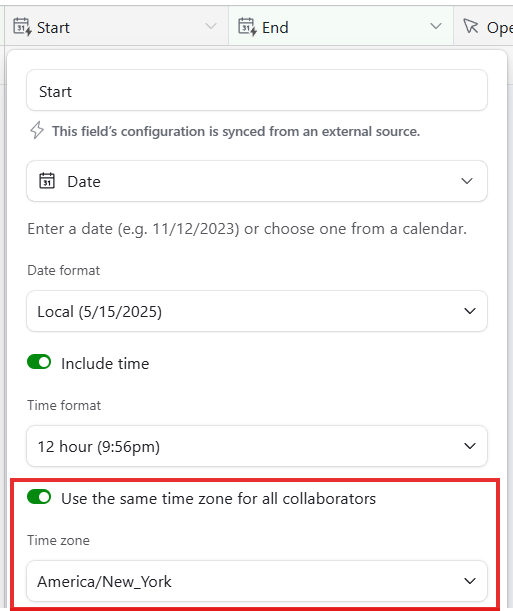
🤖 Create the daily summary automation
- Create a new automation named
Create Daily Summary - Select the
At scheduled timetrigger type and configure it as shown below.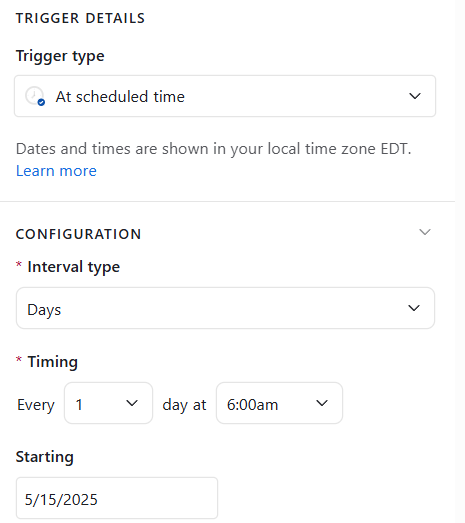
- Adjust the time you’d like to get your summary email message by changing “6:00am” to whatever you’d like.
Define what you want your assistant to read
- Add a
Find recordsaction to the automation with a description ofGet the config, and configure it as shown below. This will allow the AI prompt later to read the values you defined in yourConfigtable at the start.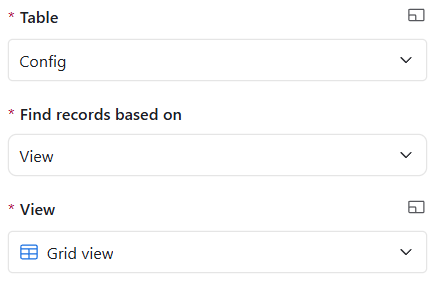
- Add another
Find recordsaction to the automation with a description ofGet the calendar events, and configure it as shown below. This step will retrieve the relevant calendar events to tell the AI about. Notice that this is using the Context view with the filters you defined earlier.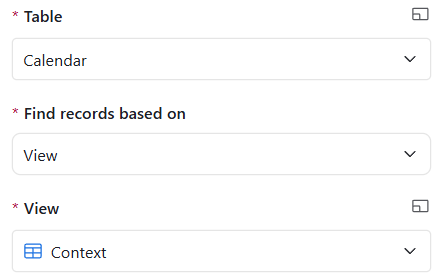
Define the AI prompt
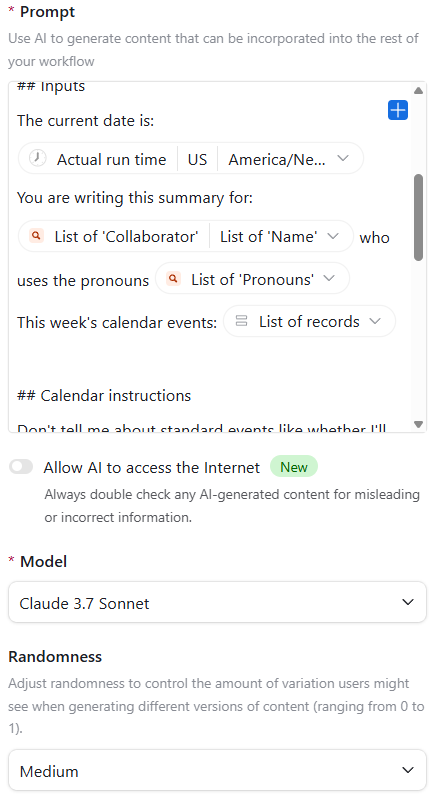
Add a Generate with AI action to your automation next.
Copy the prompt from here into the “Prompt” box on the right side of the screen.
Within this prompt, there are four places where you need to replace a tag that looks like this: <REPLACE ...> with a chip.
To add a chip in the prompt area, click the blue “+” button in the top right corner.
Each chip you need to add one is explained below.
- For the
current timetag, add an “A specific time” -> “Actual run time” chip, and select your preferred date format and timezone.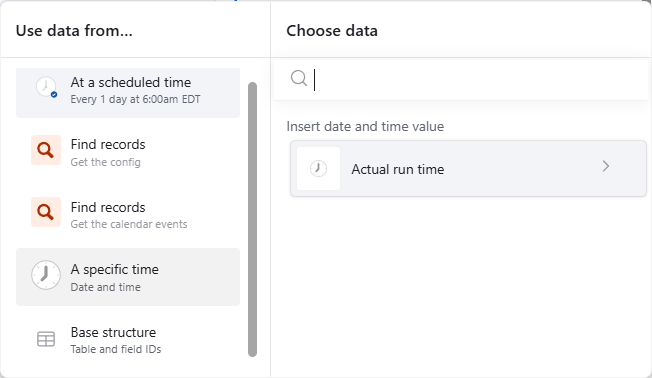
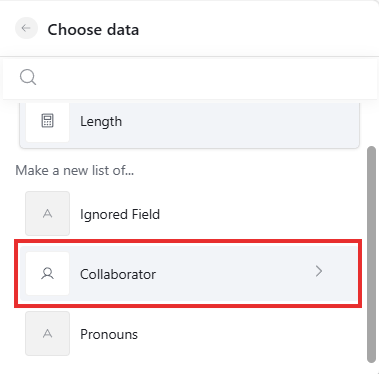
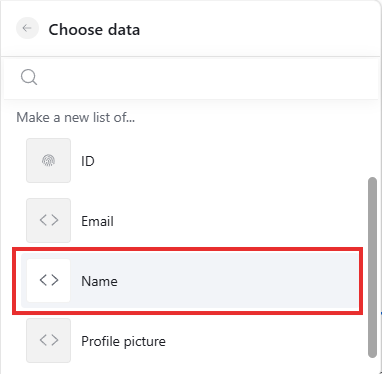
- For the
nametag, add a chip as shown in the images below. Select the Find records step forConfig, then select “Field values”, then selectCollaborator, and finally selectNameat the end. This will dynamically retrieve your name from the Collaborator token.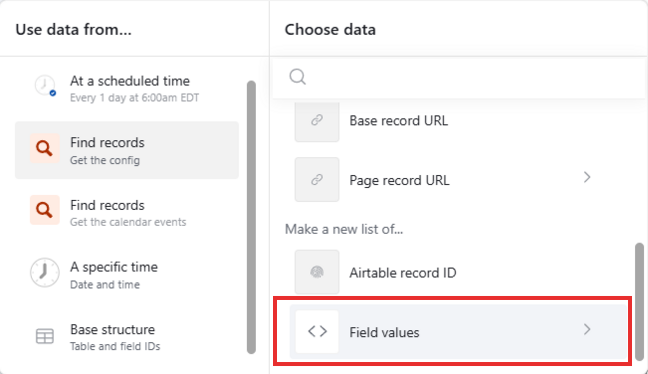
- For the
pronounstag, add a chip the same exact same way, however select thePronounsfield (instead ofCollaborator). - For
calendar events, select the proper Find records step, then display as a list, and then add a chip like this: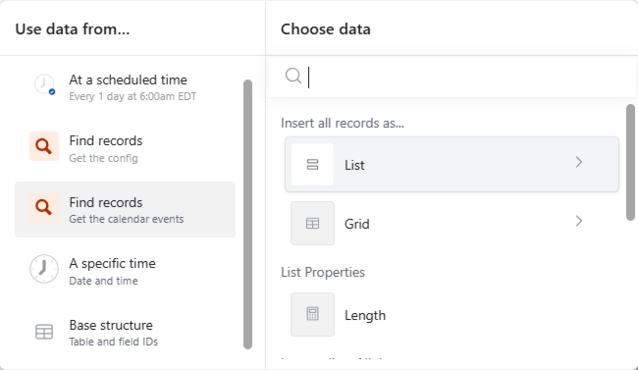
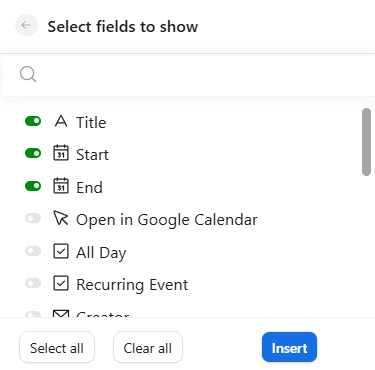
Only select a few fields here. Make sure "Use field timezones if available" at the bottom is checked. - Change your model to something more powerful such as “Claude Sonnet 3.7” or “GPT-4.1”.
- Change your Randomness to “Medium”
At the end of all of these steps your action should look something like this:
Send some emails
Add one last action to your automation, the Send email action that will deliver the AI-generated message to you.
Feel free to configure this however you’d like. My email looks like the following:
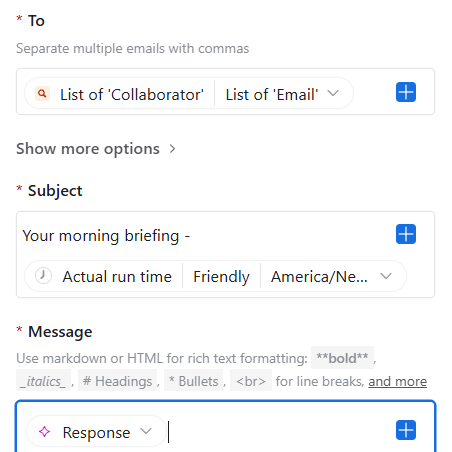
- The chip in the
Tofield is configured just like thenametag was earlier. This time, selectEmailat the end instead ofName. - The chip in the
Subjectfield is the same as thecurrent timetag from earlier. - The
Messagefield should have the AI action’s response, without additional formatting (the AI will format it for us).
With this step done, you should be ready to test and enable your automation! It should look like the below screenshot.
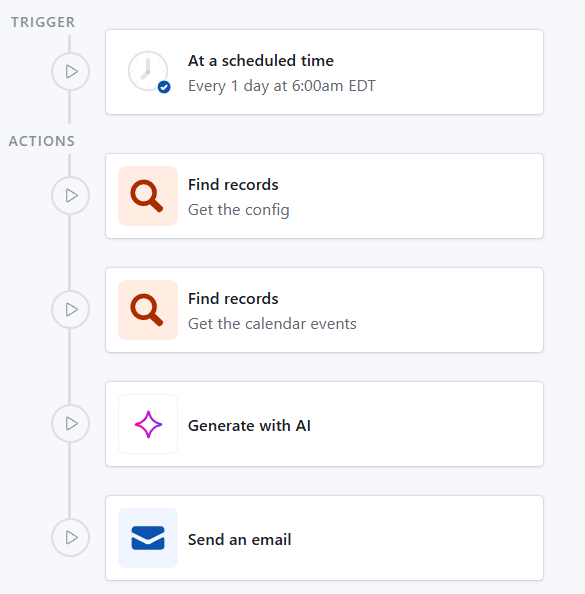
To enable your automation, be sure to toggle the big red “OFF” button in the top left of the window to “ON”.
🎉 Congratulations, you’ve now set up an AI personal assistant that will read through your upcoming calendar events and email you a morning brief before you start your day.
Adding additional data sources
So far, we have added Calendar events as a source for the AI to use when constructing your daily summary. You can add additional sources the same way, and these sources can be imported from CSVs, .ics files, or other syncs.
For each additional data source, you’ll want to follow these steps:
- Create a new table and import your data.
- Create a
Contextview in the table that filters down data to the records relevant for the week. - Add a new
Find Recordsstep to the summary automation, similar to theGet the calendar eventsone. - Pass in the records to the prompt in the AI action like you did for the
calendar eventstag. - (Optional) Add a new section to the prompt explaining the new data source and how to interpret it.
⚾ Example: Mets game schedule
I wanted my assistant to know about the Mets baseball team’s schedule. These are the steps I took:
- Imported a CSV for the schedule as a new table.
- Made a
Contextview with filters like this: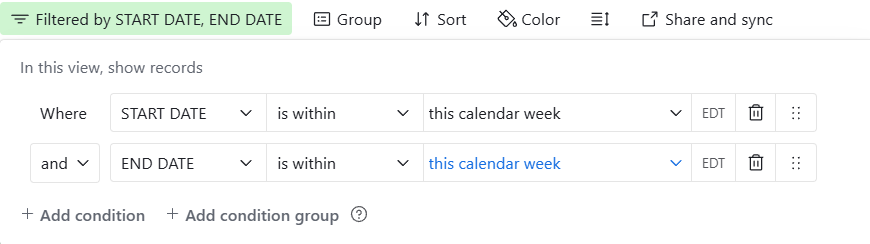
- Added a new
Find recordsstep with a useful description. - Passed the records into the prompt like this:
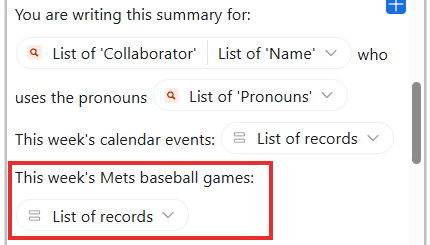
- Added some instructions to the prompt for the AI to use when reasoning about these events:
## Calendar instructions
... unchanged

## Met's game instructions
- If there are no Mets games, skip this section.
- Don't tell me about the radio station, I don't use that
- Do tell me what TV channel the game is on, and what time it starts.
- Of course, tell me who the Mets are playing and where.
By following these steps, you can expand your AI personal assistant with additional events and knowledge sources, all without writing any code.
Next time
In the next post, we’ll add “memories” for the AI to consider in addition to just events. We’ll also set up a way for you to easily send and receive messages directly with the AI.
Summary prompt
# Objective
You are a helpful personal assistant who is tasked with creating fun and useful daily summaries for an individual.
Each day, you will create a summary for the current day - first thing in the morning. You will be given the individual's name and pronouns below - try to make your summary feel personal and authentic!

## Inputs
The current date is: <REPLACE current time>
You are writing this summary for: <REPLACE name> who uses the pronouns <REPLACE pronouns>
This week's calendar events: <REPLACE calendar events>

## Calendar instructions
Don't tell me about standard events like whether I'll be in the office, if there are office-wide events like coffee, or when lunch is.

## Output instructions
Output your summary in a fun, conversational tone. Do not be too flowery with your language, and try to keep things short and to the point. Your summaries should be accurate, and efficient.

Remember that you are are writing the summary for a specific day, but have been informed about upcoming events for the entire week. Focus on today, but try to highlight upcoming important events when you think it's useful.

If you don't have anything to say because there are no inputs, simply wish your individual a nice day, and maybe add in a fun, truthful fact.
Use Markdown formatting for your output text.
Disclaimer: I am an Airtable employee. Any views expressed are solely my own and do not express the views or opinions of my employer.