Digitizing my handwritten journal entries (part 2)
This is the second post in a series about how I’m converting my handwritten journal entries into digital text. You can read the first post here.
In this update, I’ll explain the process that I took to go from ~600 entries digitized to 2717.
Scanning was too slow
Previously, I had been using Dropbox’s PDF Scanner to take photos of each page of my journal and turn them into black-and-white rectangular images. This process was painfully slow. It took around 18 seconds to do each one of these scans and uploads, however the quality of the scans was generally high.
Instead, I decided to rebuild this part of the process to be more optimized for my use case, based on two observations:
- I could capture both pages of the journal from a single photo.
- The bounding rectangle around the pages (which I often have to tweak manually) could be re-used if the camera and journal didn’t move around between photos.
So I set off on a new plan - I set up a little tripod with my phone, and took photos of the remaining pages of all of the journals. I took around 53 photos / 10 minutes while I did this, which meant the time for this part of scanning the pages was only around 5.7 seconds / page.
Converting photos to scanned images
Now that I had photos of every page of the journal, one of my original goals was actually complete: I had a full backup! But of course I want to do something with this dataset, namely enable Q&A over my past years, so there was and still is a lot of work left to do.
I now needed to convert each image into two black-and-white images that ideally also helped adjust for distortion in the original photo. I used Cursor to vibe-code a simple web app that I ran locally for this process, and set myself a hard requirement to never look at the code myself. There were some small bugs that I didn’t succeed in getting the agent to fix, but it was good enough for the rest of the process. Most importantly, I was able to build everything I needed in a few hours, and I enjoyed the process of:
- Use the tool a bit, think of some new efficiency to add.
- Kick off an agent to add the new feature to the app while I keep working.
- Refresh the page and go back to 1.
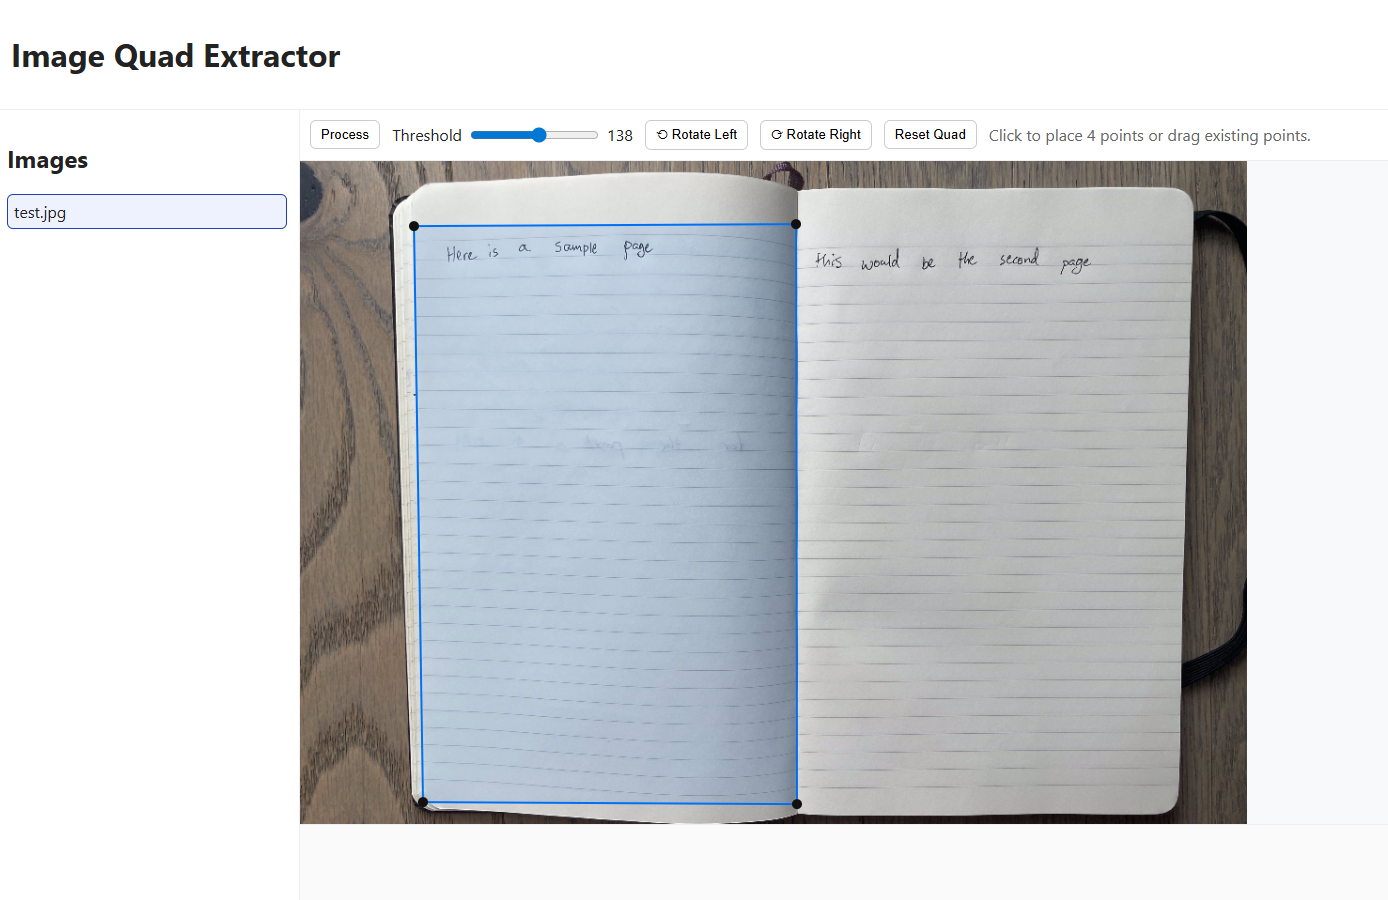
The core feature of the tool was to select the bounding quadrilateral for each journal page. Then, the image within those coordinates was flattened into a rectangular black-and-white image (using a simple RGB value cutoff).
The tool used the filesystem to keep track of the processing status of each photo, and saved the outputs into a Dropbox folder. This mean that I could work on processing across multiple devices, and my “progress” was always saved. Some other features I added to speed up the process of selecting the rectangles included:
- An approval phase where images could be accepted / rejected to allow tweaks
- Cached quad positions so that I didn’t need to move the rectangles much between photos
- Re-using the rightmost points from the left quadrilateral for the right quadrilateral (sharing the previously defined edge in the middle)
- 4x zoom preview when clicking and dragging
- Click to move nearest point to cursor
If you’re curious on how this was built, all of the prompts I used are present in the appendix.
Results
I could define 79 quadrilaterals / 10 minutes, which meant that this part of processing a page took around 7.6 seconds.
In total, this meant that each page took 5.7 + 7.6 = 13 seconds, which was 5 seconds faster than the original scanning approach. For the 2000 pages remaining, this new approach saved me nearly 3 hours.
But more importantly, it changed some of the back-breaking work of sitting hunched over a camera taking the photos to work that could be done on my laptop in my spare time.
It then took 4.5 seconds / page to run them through the ML model and upload the results to Airtable. I just let this run on my PC while I did something else.
In the next follow-up, I’ll elaborate on the accuracy of the model, as I slowly read all of the entries and correct the typos that the model produces.
Appendix
The Cursor prompts to reproduce the app I used. The code is also somewhere on GitHub, but this feels like a more fun way to show it.
Inside this directory (cmd/server) - Create a simple (ideally frameworkless or framework-lite) service that can be run locally. Here's what the server should do on a single homepage website:
- Show a list of image files in a hardcoded directory (on the local machine).
- Allow me to open an image file, and draw bounding quadrilaterals on them
- After drawing a bounding quadrilateral, save a new file to a hardcoded directory on the local machine of the image where the following have happened:
  1. The content in the  quadrilateral has been stretched using linear algebra-type transformations to be rectangular
  2. The content in the quadrilateral has been made black and white (based on a simple threshold).


Implement this system in simple steps:
1. Define a simple webserver that can read from a local directory of images and server a homepage
2. Create the image selection logic in the UI
3. Create the quadrilateral mutation functionality + endpoint to save the resulting quadrilateral and do the image manipulation on the server
Can you also add a rotate image function to the UI? This should rotate the image as requested, then later when the processing happens, the final image should end up rotated in the same way.
This is working well, but there's one big issue:
- I need to be able to make 2 different quads for the same input image.

The UI for this seems fine, but I want you to create the output files with a different naming scheme - e.g. the input file's name followed by a 1 for the first image, 2 for the second, and so on
When there is a 4 point quad rendering in App.js, I want the following behavior: If I click on the image, it should move the nearest point to the click to where the click was. This is used for precise adjustments, so I don't have to select the node beforehand.
Make it so that the first file in the list is selected if we (for instance) have just loaded the page and no other file is selected
Add a feature to the server in cmd/server that does the following:
- Show the number of output images for the corresponding input image in the left sidebar (as a badge or similar)
- Sort the images in the left sidebar so that images with outputs appear after those without outputs
Don't show the image preview in the left sidebar, it's too slow.
Also instead lets only sort images with 2 or more outputs to the bottom - sort images with 1 output to the top (or leave them unchanged)
show a numeric output for threshold, and remember the last set one in local storage so it persists on page refresh
When processing completes, the image is way too big and zoomed in - can you make it better scale to the height of the window? Definitely don't stretch it.
this looks better - but I see that after processing, the original image is somehow stil lvisible (with a really small height) can you fix that?
This is great. I want you to change a bit about how the after-processing flow works though:

1. Add an accept button - if this is pressed, it should take me back to the same image if this was the second processed image, or proceed to the next one if it was the second image. Either way, it should stop showing the processed image.
2. Add a reject button - when clicked, this should also reset the quads and take me back to the same image. It should also _delete_ the image that was saved previously, so that the next generation gets the same name.
Accepting the image the second time did not go to a new image. Is this because it gets sorted to the end first?
Maybe just change the behavior so that it goes to the "first" image in the list instead, since I am processing them top down
Make it so that when you click reject, it preserves the quadrilateral so I don't need to re-draw it.
It would also be awesome if it could remember both of the most recently used quadrilaterals, and cycle between them - so keep a cached quadrilateral for the previous "first" processing, and one for the second (then re-use the first when it switches to a new input image).

Also make the accept button green
It seems to only be remembering the "primary" quad. If I open a file, draw a quad, and click accept - I don't want to use the primary quad again, I want to use the secondary one (since this is the second processing on the same file). If a secondary prod is available, use that one.

Then after the second accept, I DO want to use the cached primary quad, if present. It's fine that this isn't stored in local storage.
Things are mostly working, however there seems to be an issue around the reject flow:
- When I reject, we properly go "back" to the proper quad (e.g. primary -> reject -> stay at primary, secondary -> reject -> stay at secondary)
- However after I later accept, the quads seem mixed up (e.g. primary -> reject -> primary -> accept -> ERROR: re shows primary)

See if you can figure out why this is happening and fix it,
Now the reject flow seems broken - when I reject after the second process call on the same image, it erroneously shows me the cached primary quad, which effectively undoes my work. Fix this
There seems to be an issue with the quads used after rejecting. I'm seeing that after rejecting, and making a small adjustment, then re-processing, the output is the same. What is going on? This might only be happening on the second processing
When the secondary quad cache is used in app.js, and a primary quad cache is present - I want you to merge the two quads together and use the result as the cached result for the secondary process. Here's how to merge them together:

- There will always be two "leftmost" and two "rightmost" points for each quad.
- There will also always be two "topmost" and two "bottommost" points for each quad.

1. Replace the top-leftmost point in the second cached quad with the top-rightmost point in the primary quad cache.
2. Replace the bottom-leftmost point in the second cached quad with the bottom-rightmost point in the primary quad cache.
3. Leave the other values in the second cached quad unchanged, and use them in the final result.
Don't produce empty catch blocks - and make sure all variables are being used. If the merging fails, just fall back to using the secondary as is and log an error to console
Please put the "Process" button on the left of the menu bar, so it appears right above the "Accept" button
Also disable the Process button while Accept / Reject are shown
Build a feature in app.js for when I'm clicking and dragging a point in a quadrilateral. When this happens, I want the canvas to show a zoomed in area around the cursor, at something like 4x zoom, so that I can accurately see what pixel I am selecting.